Step 2: Add Gas Quality and Temperature Tracking
It is now time to step up a notch your modeling capabilities by considering the gas mixture’s quality and ditching any isothermal assumption.
In SAInt, gas quality refers to the actual composition of the gas mixture transported and delivered. The gas quality covers the energy content of the mix and the concentration of each specific gas component. You can track the injected hydrogen, water traces, or pollutants like sulfur or mercury with the gas quality.
By default, the SAInt’s solver addresses any hydraulic model assuming isothermal conditions. But it is recommended to turn on temperature tracking and thermo-hydraulic analyses. This procedure will improve your model’s accuracy without requiring more data on environmental conditions, pipeline properties, and model assumptions.
1. Add gas quality to your model
SAInt calculates by default gas quality, but you can always turn it off by setting the Model Explorer tab, scrolling down, and selecting . Right-click and from the context menu, choose to add ethane from the built-in library. Repeat the same steps to add hydrogen. In the model explorer, under components, you will now see three components: methane (in black as assigned by default to all supply points), ethane (in gray as not assigned to any supply point), and hydrogen (in gray). Check the component’s properties using the property editor.
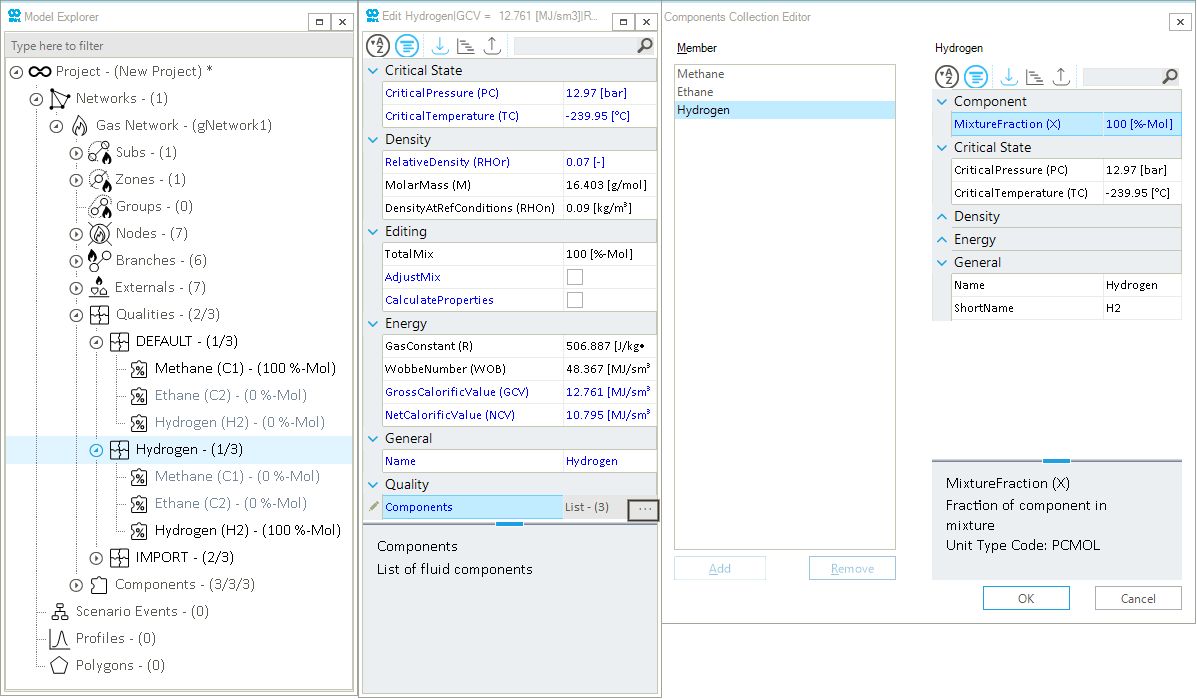
Once new components are added to the network, you can create and define new gas qualities. Select , right-click, and from the context menu, choose Add Gas Quality. A new quality is added, and you can change its properties using the property editor. Create a quality named Hydrogen and set the molar percentage of its components to 100 % hydrogen and 0 % methane and ethane, as in Figure 1.

Add a second new gas quality named IMPORT and set its components to 92 % methane and 8 % ethane. In the property editor, click the AdjustMix and CalculateProperties buttons. This procedure is only necessary when you edit the composition of your mixture, but it is a good habit to remember.
Now that you have your new gas qualities, you must assign them to the supply points. From the model explorer, expand the Supplies item under Externals and select the object GSUP.S1. From the property editor, scroll down and, under Quality, edit the property SupplyQualityName (SQSETNAME) to IMPORT. Repeat the same for the supply GSUP.P2H2 and set the quality to Hydrogen.
Now, you can model gas quality by assuming that, from your main supply point, you import a gas stream made of methane and ethane, and you have a second supply point downstream where only hydrogen is injected.
|
Check the section gas quality for more details or have a look at some How-tos like Create a Gas Component and Create and Edit a Gas Quality in the GUI. |
|
Remember, quality and components are properties of a network. If you have a scenario open, you cannot edit them! |
2. Set reference ambient temperature
SAInt handles temperature properties and temperature tracking in a simulation. So it is required to have an active scenario to set events that modify network or object properties related to temperature. So wait for the next step to dirty your hands on this issue.
But there is an aspect you can still address. As you may have noticed, one property of a network object is called default ambient temperature (TAMBDEF). This property sets the default temperature the SAInt solver uses in calculations for thermal exchange between pipelines, and the surrounding environment is considered. In the model explorer, select and, in the property editor equal, scroll down to the section Temperature. There change default ambient temperature to 5 °C. In this way, this value is considered when you do not specify such property for a pipeline.
Save the network and the project.
|
In this tutorial, you will play with the ambient temperature of the gas mixture. But you can further model thermal exchanges by specifying the heat transfer coefficient at the pipeline level ( |