Step 6: Design Scenario Events
In SAInt, events are used to change default values, settings, and controls at specified times during the scenario time window. Scenario profiles can be assigned to an event to model time-dependent changes. This step will focus on designing scenario events to create different market conditions. The objective is to understand how to define scenario events to influence the behavior of your model.
1. Create demand events
You will start by defining the electrical demand on the system.
For this, you will add two events per demand.
The first event is a PSET event, which permanently fixes the active power of an objective at a given time step.
By using multiple PSET events or assigning a profile to the PSET event, you can change the power set point modeling the dynamic behavior of an object parameter.
The second event is a PSETPRC event, which is a penalty event.
These events are used to define an additional cost on the system for not serving or curtailing the object event, in this case, a PSET event.
1.1. Add an event via the model explorer
Using the model explorer, create the PSET event on the demand objects.
Find the DEMAND1 by going to , then right-click on the demand object and select , as shown in Figure 1.
This step automatically creates the event and prompts the event property editor window.
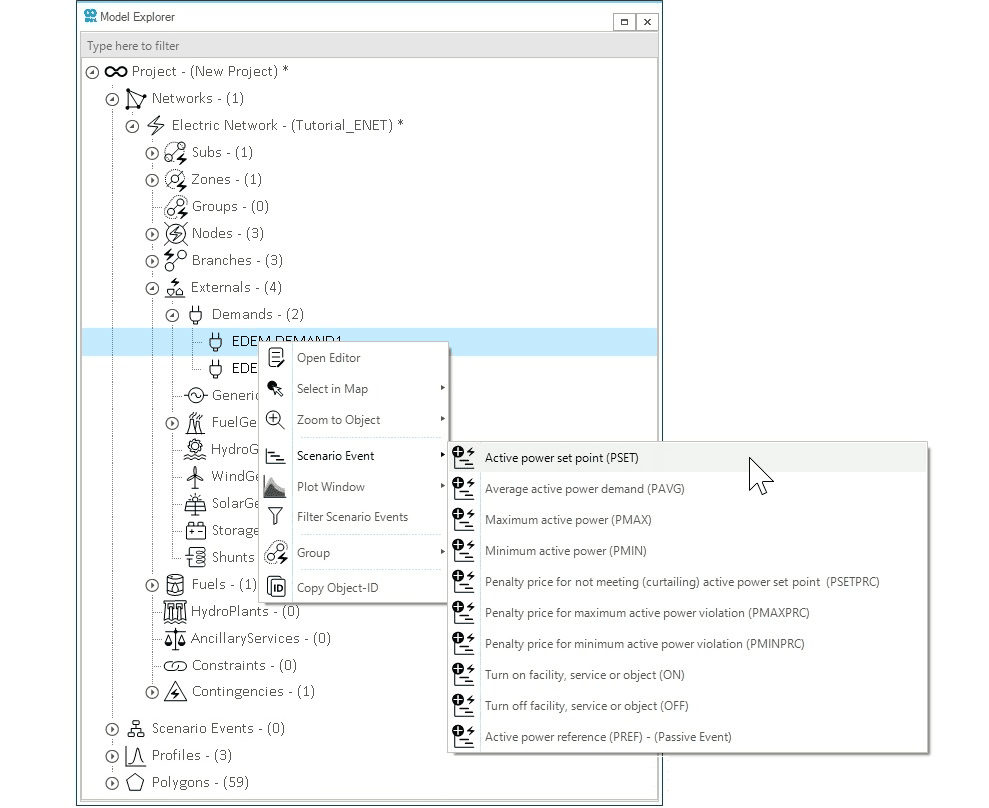
1.2. Define event properties
In the event property editor window, go to the profile category to assign a profile to the event; in the ProfileName (Profile) property, select the PRFL_DEMAND1 from the drop-down menu.
Now, in the setting category, define the Value of the event as 1.
This value will be used to scale the profile data points at each time step.
Then, change the StartTime under the time category to 01/01/2022 01:00.
Close the editor window, and you will notice that the model explorer has been updated with a new scenario event.
Repeat the same process to create a PSET event for DEMAND2, assigning PRFL_DEMAND2 to the event.
To reopen the event properties, go to in the model explorer and select an event; the property editor will automatically display the event properties.
|
|
Why did you change the In SAInt, you have "transient" and state events. A "transient" event defines the change in an object parameter over a given time interval base on the scenario time step, such as the active power of an object. In contrast, a state event defines the operational state or level of an object parameter at a specific time step, such as the commitment of a generator or the state of charge of an energy storage unit. Based on this difference, all transient events during an optimization scenario, such as DCUCOPF, must be shifted by the scenario time step because, in SAInt, the time step indicates the period from 00:00 to 01:00.
In this case, the demand event ( |
1.3. Add multiple events for the same object type
You will now create the PSETPRC events simultaneously for both demands.
In the model explorer, select both demand objects by holding Ctrl, then right-click on one of them and select .
Now, a single multi editor window will be opened for both events.
In the setting category, set a Value of 100,000 and close the window.
|
The weight or priority of a penalty event is defined by its value.
The larger the penalty cost value, the higher the priority of the event will be in the scenario.
In this case, to prioritize the |
2. Create non-dispatchable generation events
The generation fleet of production cost models can be separated into two main groups the dispatchable and non-dispatchable generators.
Dispatchable generators are units free to operate in the energy market based on their operational cost and constraints (i.e., NG_GEN1 and NG_GEN2).
Non-dispatchable generators are units "forced" to operate based on a predefined generation profile (i.e., WIND_GEN3).
In this section, you will define the predefined production of the wind generator with a PSET and PSETPRC event.
2.1. Add a new event via the node explorer
You will continue creating the PSET and PSETPRC events using the node explorer.
The node explorer is used to see all the objects (branches and externals) connected to a selected node.
Open the node explorer by clicking on the Node in the ribbon bar tab "View". Undock the node explorer window and place it so that you can see the map view and the node explorer windows at the same time. Select NODE2 in the map window and right click. Select the option "Select in Node Explorer" from the context menu to view the WIND_GEN3 in the node explorer, as shown in Figure 2.
Right-click on the WIND_GEN3 and create a PSET and PSETPRC event.
For now, close the event property editor windows since you will define the properties using the event table (EEVT).

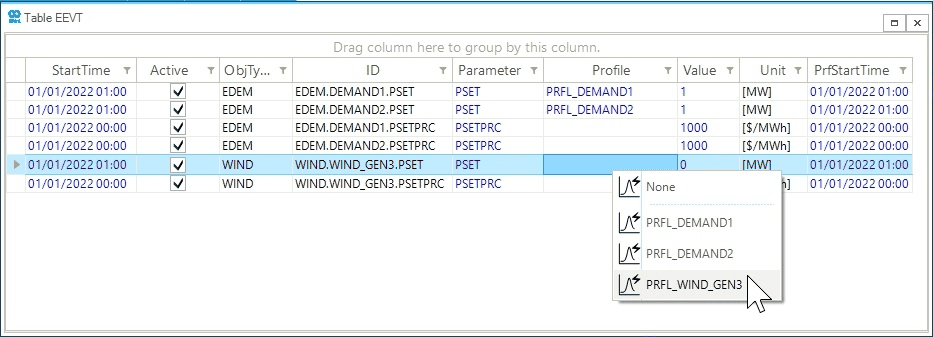
2.2. Edit event properties in the event table
The event table can be used to review, filter, and edit scenario events. Open the event table by going to the scenario tab and clicking on EEVT. Once opened, you should view a table with six events, like in to Figure 3.
Now, you can directly edit the event properties in the table.
In the row of the wind PSET event, define a StartTime of 01/1/2022 01:00.
Assign the wind normalized generation profile to the event by right-clicking on the corresponding cell under the Profile column and selecting PRFL_WIND_GEN3 from the menu, as shown in Figure 3.
Instead of using a number for the Value, you will define the value as the installed capacity of the generator by entering WIND.WIND_GEN3.PMAXDEF, remember this value will be multiplied by the assigned profile, resulting in the hourly dispatch of the wind generation.
You will leave the PSETPRC event with a value of 0.
This configuration means the solver can curtail the wind generation without any penalties.